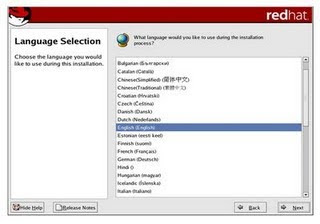
Disk Partitioning Setup
Partitioning allows you to divide your hard drive into isolated sections, where each section behaves as its own hard drive. Partitioning is particularly useful if you run multiple operating systems.
On this screen, you can choose to perform automatic partitioning, or manual partitioning using Disk Druid.
Automatic partitioning allows you to perform an installation without having to partition your drive(s) yourself. If you do not feel comfortable with partitioning your system, it is recommended that you do not choose to partition manually and instead let the installation program partition for you.
To partition manually, choose the Disk Druid partitioning tool.
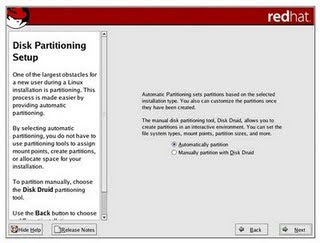 Partitioning Your System If you chose to partition manually, you must tell the installation program where to install Red Hat Enterprise Linux. This is done by defining mount points for one or more disk partitions in which Red Hat Enterprise Linux is installed.
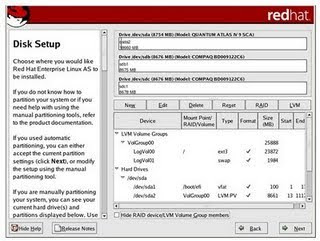
These buttons control Disk Druid's actions. They are used to change the attributes of a partition (for example the file system type and mount point) and also to create RAID devices. Buttons on this screen are also used to accept the changes you have made, or to exit Disk Druid. For further explanation, take a look at each button in order: Edit: Used to modify attributes of the partition currently selected in the Partitions section. Selecting Edit opens a dialog box. Some or all of the fields can be edited, depending on whether the partition information has already been written to disk. To make a RAID device, you must first create (or reuse existing) software RAID partitions. Once you have created two or more software RAID partitions, select Make RAID to join the software RAID partitions into a RAID device.
Partition Fields
Device: This field displays the partition's device name. Mount Point/RAID/Volume: A mount point is the location within the directory hierarchy at which a volume exists; the volume is "mounted" at this location. This field indicates where the partition is mounted. If a partition exists, but is not set, then you need to define its mount point. Double-click on the partition or click the Edit button. Type: This field shows the partition's file system type (for example, ext2 or ext3). Format: This field shows if the partition being created will be formatted. Size (MB): This field shows the partition's size (in MB). Start: This field shows the cylinder on your hard drive where the partition begins. End: This field shows the cylinder on your hard drive where the partition ends.
Recommended Partitioning Scheme
The following is a list of recommendations for partitioning your system: A swap partition (at least 256 MB) — swap partitions are used to support virtual memory. In other words, data is written to a swap partition when there is not enough RAM to store the data your system is processing.
If you are unsure about what size swap partition to create, make it twice the amount of RAM on your machine. It must be of type swap. Creation of the proper amount of swap space varies depending on a number of factors including the following (in descending order of importance): The applications running on the machine. The amount of physical RAM installed on the machine. The version of the OS. Swap should equal 2x physical RAM for up to 2 GB of physical RAM, and then 1x physical RAM for any amount above 2 GB, but never less than 32 MB. Using this formula, a system with 2 GB of physical RAM would have 4 GB of swap, while one with 3 GB of physical RAM would have 5 GB of swap. Creating a large swap space partition can be especially helpful if you plan to upgrade your RAM at a later time. For systems with really large amounts of RAM (more than 32 GB) you can likely get away with a smaller swap partition (around 1x, or less, of physical RAM). A root partition (500 MB - 5.0 GB) — this is where "/" (the root directory) is located. In this setup, all files — except for files stored in /boot (on x86, AMD64, and Intel EM64T) are on the root partition. A 500 MB partition allows you to install a minimal installation; while a 5.0 GB root partition lets you perform a full installation, choosing all package groups. It is recommended that you create a /boot/ partition (100 MB). /boot/ contains the kernels, along with files used during the bootstrap process
If you do not have a network device, this screen does not appear during your installation and you should advance to The installation program automatically detects any network devices you have and displays them in the Network Devices list.
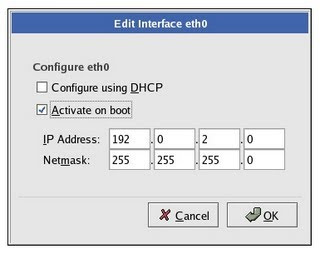
Once you have selected a network device, click Edit. From the Edit Interface pop-up screen, you can choose to configure the IP address and Netmask of the device via DHCP (or manually if DHCP is not selected) and you can choose to activate the device at boot time. If you select Activate on boot, your network interface is started when you boot. If you do not have DHCP client access or you are unsure what to provide here, please contact your network administrator.
Red Hat Enterprise Linux offers firewall protection for enhanced system security. A firewall exists between your computer and the network, and determines which resources on your computer remote users on the network can access. A properly configured firewall can greatly increase the security of your system.
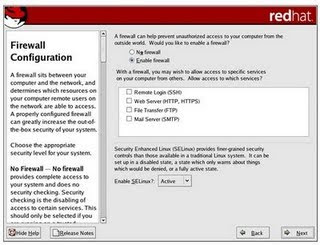
Firewall Configuration
Next, you can decide whether to enable a firewall for your Red Hat Enterprise Linux system. No firewall No firewall provides complete access to your system and does no security checking. Security checking is the disabling of access to certain services. This should only be selected if you are running on a trusted network (not the Internet) or plan to do more firewall configuration later.
Enable firewall
If you choose Enable firewall, connections are not accepted by your systems (other than the default settings) that are not explicitly defined by you. By default, only connections in response to outbound requests, such as DNS replies or DHCP requests are allowed. If access to services running on this machine is needed, you can choose to allow specific services through the firewall.
If you are connecting your system to the Internet, this is the safest option to choose. Next, select which services, if any, should be allowed to pass through the firewall. Enabling these options allow the specified services to pass through the firewall. Note, these services may not be installed on the system by default. Make sure you choose to enable any options that you may need.
Remote Login (SSH)
Secure Shell (SSH) is a suite of tools for logging in to and executing commands on a remote machine. If you plan to use SSH tools to access your machine through a firewall, enable this option. You need to have the openssh-server package installed in order to access your machine remotely, using SSH tools.
Web Server (HTTP, HTTPS)
The HTTP and HTTPS protocols are used by Apache (and by other Web servers) to serve webpages. If you plan on making your Web server publicly available, enable this option. This option is not required for viewing pages locally or for developing webpages. You must install the httpd package if you want to serve webpages.
File Transfer (FTP)
The FTP protocol is used to transfer files between machines on a network. If you plan on making your FTP server publicly available, enable this option. You must install the vsftpd package in order to publicly serve files.
Mail Server (SMTP)
If you want to allow incoming mail delivery through your firewall, so that remote hosts can connect directly to your machine to deliver mail, enable this option. You do not need to enable this if you collect your mail from your Internet Service Provider's server using POP3 or IMAP, or if you use a tool such as fetchmail. Note that an improperly configured SMTP server can allow remote machines to use your server to send spam.
Language Support Selection
You can install and support multiple languages for use on your system. You must select a language to use as the default language. The default language is the language used on the system once the installation is complete. Typically, the default language is the language you selected to use during the installation. If you choose to install other languages during this installation, you can change your default language after the installation. If you are only going to use one language on your system, selecting only that language saves significant disk space.
Caution
If you select only one language, you can only use that specified language after the installation is complete.

Language Support Selection
To use more than one language on your system, choose specific languages to be installed or select all languages to have all available languages installed on your Red Hat Enterprise Linux system. Use the Reset button to cancel your selections. Resetting reverts to the default; only the language you selected for use during the installation is installed. Tip To change the language configuration after you have completed the installation, use the Language Configuration Tool. Type the system-config-language command in a shell prompt to launch the Language Configuration Tool. If you are not root, it prompts you for the root password to continue. Time Zone Configuration Set your time zone by selecting the city closest to your computer's physical location. There are two ways for you to select your time zone: Using your mouse, click on the interactive map to select a specific city (represented by a yellow dot). A red X appears indicating your selection. You can also scroll through the list at the bottom of the screen to select your time zone. Using your mouse, click on a location to highlight your selection
Configuring the Time Zone
Select System Clock uses UTC if you know that your system is set to UTC. To change your time zone configuration after you have completed the installation, use the Time and Date Properties Tool.
Type the system-config-date command in a shell prompt to launch the Time and Date Properties Tool. If you are not root, it prompts you for the root password to continue. To run the Time and Date Properties Tool as a text-based application, use the command timeconfig.
Set Root Password
Setting up a root account and password is one of the most important steps during your installation. Your root account is similar to the administrator account used on Windows NT machines. The root account is used to install packages, upgrade RPMs, and perform most system maintenance. Logging in as root gives you complete control over your system. Note The root user (also known as the superuser) has complete access to the entire system; for this reason, logging in as the root user is best done only to perform system maintenance or administration.
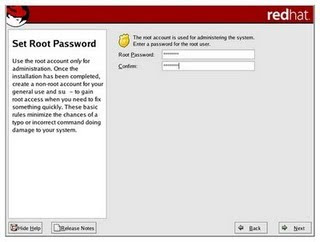
Root Password
Use the root account only for system administration. Create a non-root account for your general use and su - to root when you need to fix something quickly. These basic rules minimize the chances of a typo or an incorrect command doing damage to your system. To become root, type su - at the shell prompt in a terminal window and then press Enter. Then, enter the root password and press Enter.
The installation program prompts you to set a root password for your system. You cannot proceed to the next stage of the installation process without entering a root password The root password must be at least six characters long; the password you type is not echoed to the screen. You must enter the password twice; if the two passwords do not match, the installation program asks you to enter them again.
Tip
To change your root password after you have completed the installation, use the Root Password Tool.
Type the system-config-rootpassword command in a shell prompt to launch the Root Password Tool. If you are not root, it prompts you for the root password to continue. A root password is the administrative password for your Red Hat Enterprise Linux system. You should only log in as root when needed for system maintenance. The root account does not operate within the restrictions placed on normal user accounts, so changes made as root can have implications for your entire system.
Package Group Selection
Now that you have made most of the choices for your installation, you are ready to confirm the default package selection or customize packages for your system.
The Package Installation Defaults screen appears and details the default package set for your Red Hat Enterprise Linux installation. This screen varies depending on the version of Red Hat Enterprise Linux you are installing.
To customize your package set further, select Customize the set of packages to be installed option on the screen. Clicking Next takes you to the Package Group Selection screen. You can select package groups, which group components together according to function (for example, X Window System and Editors), individual packages, or a combination of the two. To select a component, click on the checkbox beside it.
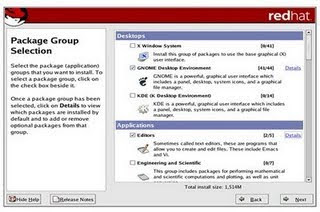
Package Group Selection
Select each component you wish to install. Selecting Everything (at the end of the component list) installs all packages included with Red Hat Enterprise Linux. Once a package group has been selected, click on Details to view which packages are installed by default, and to add or remove optional packages from that group. (Package Group Details)
Preparing to Install
A screen preparing you for the installation of Red Hat Enterprise Linux now appears. For your reference, a complete log of your installation can be found in /root/install.log once you reboot your system.
Warning
If, for some reason, you would rather not continue with the installation process, this is your last opportunity to safely cancel the process and reboot your machine. Once you press the Next button, partitions are written and packages are installed. If you wish to abort the installation, you should reboot now before any existing information on any hard drive is rewritten.
Installing Packages
At this point there is nothing left for you to do until all the packages have been installed. How quickly this happens depends on the number of packages you have selected and your computer's speed.
Installation Complete
Congratulations! Your Red Hat Enterprise Linux installation is now complete! The installation program prompts you to prepare your system for reboot. DOS versus Linux commands
In this appendix, we matched DOS commands with their Linux equivalent. As an extra means of orientation for new users with a Windows background, the table below lists MS-DOS commands with their Linux counterparts. Keep in mind that Linux commands usually have a number of options. Read the Info or man pages on the command to find out more.
No comments:
Post a Comment